Thursday, May 2, 2013

Little Lamb (Free Pattern)

0 comments

Someone on Ravelry asked for a pattern of this Little Lamb that I made couple years ago!  Yes, it's really a cute little lamb!  This is one of my daughter's favorite amigurumis! 

I used the Bernat Worsted yarns which are very soft.  It's a good yarn to make ami!  I bought the safety eyes at 6060 which has many sizes of safety eyes and they also hand-paint safety eyes for customers.  You can also download a PDF file on Ravelry! Enjoy!


Little Lamb

Approximately 9” tall


Materials:

Bernat Worsted yarn colors white and dark heather (used in this project)

1 pair of 9mm black safety eyes (www.6060.etsy.com)

Beige color felt

Red and tan color embroidery floss

Yarn needle

Size G hook

Fiberfill


Muzzle

With a beige color felt, cut a circle about 2” in diameter. 

With a red color floss, embroider a nose about 0.25”x 0.125” (6mm x 4mm) on the muzzle.

With a tan color floss, embroider a mouse below the nose as shown in the picture.


Head

With White yarn, Ch 2

Rnd 1: 6sc in the 2nd ch from hook – 6 sts

Rnd 2: 2sc in each st around – 12 sts

Rnd 3: *1sc in next st, 2sc in next st; rep from * around – 18 sts

Rnd 4: *1sc in next 2 sts, 2sc in next st; rep from * around – 24 sts

Rnd 5: *1sc in next 3 sts, 2sc in next st; rep from * around – 30 sts

Rnd 6: *1sc in next 4 sts, 2sc in next st; rep from * around – 36 sts

Rnd 7: *1sc in next 5 sts, 2sc in next st; rep from * around – 42 sts

Rnds 8-16: 1sc in each st around – 42 sts

Rnd 17: *1sc in next 5 sts, sc2tog in next st; rep from * around – 36 sts

Rnd 18: *1sc in next 4 sts, sc2tog in next st; rep from * around – 30 sts

Rnd 19: *1sc in next 3 sts, sc2tog in next st; rep from * around – 24 sts

Rnd 20: 1sc in each st around – 24 sts

With a tan color floss, sew the muzzle on head.

Place safety eyes in place. Stuff as work progresses.

Rnd 21: *1sc in next 2 sts, sc2tog in next st; rep from * around – 18 sts

Rnd 22: *1sc in next st, sc2tog in next st; rep from * around – 12 sts

Stuff head firmly

Rnd 23: sc2tog 6 times around – 6 sts

Fasten Off.


Ears (make 2)

With Dark Heather yarn

Ch 2

Rnd 1: 6sc in 2nd ch from hook

Rnd 2: 2sc in each st around – 12 sts

Rnds 3-6: 1sc in each st around – 12 sts

Fasten Off.  Leave a long tail for sewing.  Sew open end together and sew to head


Body

With White yarn

Ch 2

Rnd 1: 6sc in 2nd ch from hook

Rnd 2: 2sc in each st around – 12 sts

Rnd 3: *1sc in next st, 2sc in next st; rep from * around – 18 sts

Rnd 4: *1sc in next 2 sts, 2sc in next st; rep from * around – 24 sts

Rnd 5: *1sc in next 3 sts, 2sc in next st; rep from * around – 30sts

Rnds 6-13: 1sc in each st around – 30 sts

Stuff fiberfill as work progresses

Rnd 14: *1sc in next 3 sts, sc2tog in next st; rep from * around – 24 sts

Rnd 15: *1sc in next 2 sts, sc2tog in next st; rep from * around – 18 sts

Rnd 16: *1sc in next st, sc2tog in next st; rep from * around – 12 sts

Fasten Off.  Leave a long tail to sew on Head


Arms (Make 2)

With Dark Heather yarn

Ch 2

Rnd 1: 4sc in 2nd ch from hook

Rnd 2: 2sc in each st around – 8 sts

Rnds 3-9: 1sc in each st around – 8 sts

Stuff fiberfill

Rnd 10: *sc2tog; rep * around – 4 sts

Rnd 11: sc2tog 2 times – 2 sts

Fasten Off.  Leave a long tail and sew on Body


Legs (Make 2)

With Dark Heather yarn

Ch 2

Rnd 1: 6sc in 2nd ch from hook

Rnd 2: 2sc in each st around – 12 sts

Rnds 3-11: 1sc in each st around – 12 sts

Stuff fiberfill

Rnd 12: *sc2tog; rep * around – 6 sts

Rnd 13: *sc2tog; rep * around – 3 sts

Fasten Off.  Leave a long tail and sew on Body

Tuesday, April 30, 2013

Emmy's Baby Cardigan (Free Pattern)

39 comments

Last Wednesday afternoon, my friend invited me to her daughter's 1st birthday party on Saturday!  It was such a rush invitation that I didn't know what gift I should buy for Emmy!  When Emmy was born in last spring, I crocheted a pink dress for her.  It would be so nice to make a cardigan for her this time.  

I was thankful that I have a Bernat Softee Baby yarn at home that I bought it a year or two ago.  It's perfect to make a cardigan!  I found a pattern on Ravelry but the size is for infants to 6 months.  So I changed the hook size and gauge and make it for a 1-year-old.  I also modified the length of the sleeves, the pattern on the neck and crochet technique.  This cardigan is very easy to make and it's done in one day!  Enjoy!


Materials:

Baby yarns (Bernat Softee Baby – Antique White was used in this project)

Size G hook

Yarn needle

A button


Size: 12 months old

Gauge: 18 sts and 8 rows=4”


NOTE: All dcs are worked on back loop only.  Only 3dc-in-next st and 5dc-in-next-st are worked on both loops.


Starting at the neck

Row 1: Chain 72 sts. 1 dc in 4th st from hook, *3 dc in next st, 1 dc in next 4 sts; repeat from* across, ending with 3 dc in next st; 1 dc in last 2 sts. Chain 3, turn.

ROW 2: Skip 2 sts; 1 dc in next st; 5 dc in next st; 1 dc in next 2 sts ; *skip 2 sts, 1 dc in next 2 sts; 5 dc in next st; 1 dc in next 2 sts; repeat from* 12 times. Ch 3, turn.

ROW 3: Skip 2 sts, 1 dc in next 2 sts; 3 dc in next st; 1 dc in next 3 sts; *skip 2 sts; 1 dc in next 3 sts; 3 dc in next st; 1 dc in next 3 sts; repeat from* 12 times. Chain 3, turn.

ROW 4: Skip 2 sts, 1 dc in next 2 sts; 5 dc in next st; 1 dc in next 3 sts; *skip 2 sts; 1 dc in next 3 sts; 5 dc in next st; 1 dc in next 3 sts; repeat from* 12 times. Chain 3, turn.

ROW 5: Skip 2 sts, 1 dc in next 3 sts; 3 dc in next st; 1 dc in next 4 sts; *skip 2 sts; 1 dc in next 4 sts; 3 dc in next st; 1 dc in next 4 sts; repeat from* 12 times. Chain 3, turn.

ROW 6: Skip 2 sts; 1 dc in next 3 sts; 5 dc in next st; 1 dc in next 4 sts; *skip 2 sts; 1 dc in next 4 sts; 5 dc in next st; 1 dc in next 4 sts; repeat from* 12 times. Chain 3, turn.

ROW 7: Skip 2 sts; 1 dc in next 4 sts; 3 dc in next st; 1 dc in next 5 sts; *skip 2 sts, 1 dc in next 5 sts; 3 dc in next st; 1 dc in next 5 sts; repeat from* 12 times. Chain 3, turn.

ROW 8: Skip 2 sts; 1 dc in next 4 sts; 5 dc in next st; 1 dc in next 5 sts; *skip 2 sts; 1 dc in next 5 sts; 5 dc in next st; 1 dc in next 5 sts; repeat from* 12 times. Chain 3, turn.

ROW 9: Skip 2 sts, 1 dc in next 5 sts; 3 dc in next st; 1 dc in next 6 sts; *skip 2 sts; 1 dc in next 6 sts; 3 dc in next st; 1 dc in next 6 sts; repeat from* 12 times. Chain 3, turn.

ROW 10: Skip 2 sts, 1 dc in next 5 sts; 5 dc in next st; 1 dc in next 6 sts; *skip 2 sts; 1 dc in next 6 sts; 5 dc in next st; 1 dc in next 6 sts; repeat from* 12 times. Chain 3, turn.

ROW 11: SEPARATION: Skip 2 sts; 1 dc in next 6 sts; 3 dc in next st; 1 dc in next 7 sts; **skip 2 sts; 1 dc in next 7 sts; 3 dc in next st; 1 dc in next 7 sts **; skip the next 53 dcs (3 patterns) for the sleeve; repeat between ** 4 times for the back; skip the next 53 dcs (3 patterns) for second sleeve; repeat between ** 2 times. Chain 3, turn.

ROW 12: Skip 2 sts; 1 dc in next 6 sts; 5 dc in next st; 1 dc in next 7 sts; *skip 2 sts; 1d c in next 7 sts; 5 dc in next st; 1 dc in next 7 sts; repeat from* across row. Chain 3, turn.

ROW 13: Skip 2 sts, 1 dc in next 7 sts; 3 dc in next st; 1 dc in next 8 sts; *skip 2 sts; 1 dc in next 8 sts; 3 dc in next st; 1 dc in next 8 sts; repeat from* across row. Chain 3, turn.

ROW 14: Skip 2 sts, 1 dc in next 7 sts; 5 dc in next st; 1 dc in next 8 sts; *skip 2 sts; 1 dc in next 8 sts; 5 dc in next st; 1 dc in next 8 sts; repeat from* across row. Chain 3, turn.

ROW 15: Skip 2 sts, 1 dc in next 8 sts; 3 dc in next st; 1 dc in next 9 sts; *skip 2 sts; 1 dc in next 9 sts; 3 dc in next st; 1 dc in next 9 sts; repeat from* across row. Chain 3, turn.

ROW 16: Skip 2 sts, 1 dc in next 8 sts; 5 dc in next st; 1 dc in next 9 sts; *skip 2 sts; 1 dc in next 9 sts; 3 dc in next st; 1 dc in next 9 sts; repeat from* across row. Chain 3, turn.

ROWS 17-19: Skip 2 sts, 1 dc in next 9 sts; 3 dc in next st; 1 dc in next 10 sts; *skip 2 sts; 1 dc in next 10 sts; 3 dc in next st; 1 dc in next 10 sts; repeat from* across row. Chain 3, turn.

ROW 20: Skip 2 sts, 1 dc in next 9 sts; 3 dc in next st; 1 dc in next 10 sts; *skip 2 sts; 1 dc in next 10 sts; 3 dc in next st; 1 dc in next 10 sts; repeat from* across row. DO NOT FASTEN OFF. 


FINISHING

Continue at the lower corner of Right Front.

Ch 1.  2 sc in the corner st.  work sc evenly across Right Front neck.  Ch 4 (to make a button hole). Sl st of the last st.  2 sc in the corner st.  *1 sc in the next st, ch 3, 1 sc in the next st; repeat from * across Neck. 3 sc in the corner st.  work sc evenly across Left Front. 3 sc in the corner st.  1 sc in each st along the bottom of the cardigan ending at the lower corner of Right Front.  Fasten Off.


Sew a button on the upper corner of Left Front.

Hello Kitty Amigurumi

0 comments

My friend asked me to make a Hello Kitty amigurumi for her!  The first thing came up to my mind was "those Hello Kitty pattens are so awful"!  It's because I've seen so many Hello Kitty ami on the internet that are either out of shape or out of ratio!  They don't look like Hello Kitty!  So I told my friend Hello Kitty was not good looking!

Indeed, I, myself, love Hello Kitty so much!  I'm still using some Hello Kitty stuffs at home!  I was thinking if those patterns are not good enough, I can make a pattern by myself!  So I started crocheting and writing this Hello Kitty pattern last weekend!  I'm very happy about it in terms of colors, shapes and ratio!  This is a very good looking Hello Kitty ami I've ever seen!  I know my friend would like it too!

To purchase this pattern, please visit my ravelry store!

Tuesday, April 23, 2013

JiJi Door Stopper

0 comments

I recently made a black cat door stopper that my friends admire a lot!  So one of my friends asked me if I could make JiJi from "KiKi's Delivery Service"!  I watched this Japanese animation many years ago and didn't remember there was a cat in the movie! Alright, thanks for Google images and I got inspired to make this JiJi cat for my friend who will be moving to Arizona very soon!  

Indeed I made another door stopper for another friend a month ago. That one was a lion door stopper!  I need some time to write the pattern and I will post it here next month....I hope!

To download this JiJi pattern, please purchase from my ravelry store!


Gifts for a Cousin!

1 comments

We recently took a trip to Hong Kong to visit families there!  I haven't seen my sister and cousins for so many years and I was so glad to know that one of my cousins just got pregnant!  Before we went, I made two beautiful gifts for my cousin and her baby!  One of them was a baby blanket called Ocean Wave (pattern can be found on ravelry.com - free).  I didn't know that she's carrying a boy when I made it, so I picked some colors that should match for both genders! It turns out so perfectly for her baby boy!  Another gift was for my cousin!  She is a die-hard fan of Snoopy! She has all kinds of Snoopy collection!!  But I'm sure she never owns an amigurumi Snoopy!  So I bought this pattern at Etsy.com and made this cutie Snoopy for her!

Best wishes to you and your baby, Carmen!


Saturday, April 20, 2013

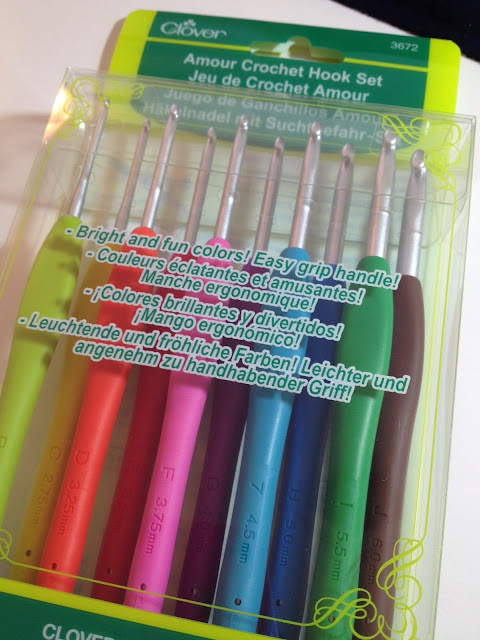
New Clover Amour Crochet Hooks

2 comments

New New New!  I just bought a set of Clover crochet hooks a week ago!  It's called CLOVER AMOUR!  Clover used to have those yellow color with a spot of soft touch grip crochet hooks in the market for a very long time.  Since another Japanese brand named TULIP (it's my favorite brand) has imported to the US few years ago, its famous crochet hooks ETIMO get so popular! It's because the body of the whole crochet hook is made in soft plastic.  It's so comfortable to hold the hook in your hand and your fingers won't get hurt after hours of crocheting! Now, Clover has manufactured these kind of hooks in beautiful colors!  I bought a set of 10 hooks from size B (2.25mm) to size J (6.0cm) which is my 3rd crochet set!  The shape, material and texture are as same as those TULIP ETIMO hooks!  You may give it a try!  

I saw the Clover Amour set on ebay.  The price is very compatible with TULIP ETIMO which is about $80 per set (including a hook case).  However, I also found TULIP ETIMO launching at A.C. Moore recently!  If you somehow receive an A.C. Moore coupon, you may save up to 50% off on a regular item which would be about $35-$40! 

Once you have used either the TULIP ETIMO or CLOVER AMOUR hooks, you won't go back to those hard and heavy aluminum hooks!


My Collections: Clover Soft Touch (Upper pink Set), Tulip Etimo (Left) and Clover Amour (Right)

Tuesday, March 19, 2013

Covered Button Ponytail Holder (Free Tutorial)

0 comments
 I love all kinds of craft since I was young.  I guess I'm inspired by my mom who was so talented especially in sewing and knitting!  She used to sew dresses and knit sweaters for me and my sister when we were young.  When I became a teenager, I started to use a sewing machine to make some little string-pull bags for my stuffs.  Ponytail holders were something I loved to sew.  Now, I become a mother of two pretty daughters. I love to make handmade things for them. These ponytail holders are some of them!  Below is a tutorial video of showing how to make ponytail holders with cover buttons.  For cover button supplies, please visit my shop here.


Luggage Tags (Free Pattern)

2 comments
  
Spring Break is coming soon! We're so excited to take a distance trip to Asia again this year!  Couple years ago when we had a trip to Hong Kong, one of our luggage bags was mistaken by someone. We waited for an hour sitting at the airport for the person to return the luggage to us.  I understand many luggage bags look so similar and it's so easy to mistake, so I made some luggage tags with our family initial on them! They are personal and distinguished!  Here is a free pattern to share with you!  They are good to hang on children's school bags or lunch bags too!
 

Luggage Tag
diameter approx 3"

Materials:
2 colors of any worst yarns
hook I
yarn needle

With Color A
R1: Ch 2, 6sc in the second chain from hook
R2: 2sc in each sc around (12sts)
R3: *Sc 1, 2sc in the next ch* rep 6 times (18sts)

R4: *Sc 2, 2sc in the next ch* rep 6 times (24sts)
Change to Color B
R5: *Sc 3, 2sc in the next ch* rep 6 times. sl st in the first chain of this row (30sts)
Ch 30, sl st in the first chain.  Fasten Off

Initial
With Color B on a yarn needle
Sew the initial of your choice by using Chain Stitch (see pictures below)


 Insert the hook at the starting point and pull a loop up.

 Then insert the hook to the next spot and pull out a loop through the first loop.  Continue to sew an initial.


Tuesday, March 12, 2013

Fat Cat Door Stopper

0 comments

I fell in love with this kitty when I first saw it on Ravelry.  It's a free pattern from Lion Brand. I am not a cat-lover but this cutie kitty is too adorable that I can't ignore it!

The pattern is very easy to follow, however, black color of yarn is a problem (I feel like I'm getting old)!  It's so difficult to see between stitches because the color is too dark! Anyway, it's cute!  Indeed, I have changed the pattern a little bit.  Instead of making the collar separately, I changed to red color on the last 2 rows of the body pattern. 

I'm designing patterns of door stoppers and I will share free patterns here. Stay tuned!


Agnes Gurumi Copyright © 2012 Design by Ipietoon Blogger Template